sentry
Overview
Treasurenet is a consensus protocol blockchain technology based on EVM and Cosmos-SDK. When some of our nodes become Validators, they need to propose and sign blocks, which requires validators to continuously access private keys to obtain the ability to continuously sign blocks. This process of accessing private keys and accessing nodes has security vulnerabilities.
1. Introduction to Security Situation
1.1 When our validator node accesses the private key, if the validator node is leaked, our private key will also be leaked. This leads to the risk of signing malicious blocks incorrectly.
==Detailed Explanation:==
When a validator node is compromised, the risks associated with the associated private key can be understood from the following aspects:
- The relationship between the validator and the private key: In blockchain networks, validators typically hold the corresponding private key. This private key is the core of the validator's identity, used to generate signatures for blocks to prove the legality and validity of the blocks. The confidentiality and security of the private key are crucial for validators because once the private key is leaked, attackers can impersonate the validator to engage in malicious activities.
- The risk of the validator node being compromised: If the validator node is hacked or compromised by other malicious parties, all sensitive information stored on that node (including the private key) could be stolen or tampered with. This means that attackers can easily obtain the private key, thus having the same permissions and capabilities as the validator.
- The consequences of private key leakage: Once the private key is leaked, attackers can use it to perform various malicious operations on the blockchain network, including but not limited to signing malicious blocks. Due to the immutability and decentralization of blockchain, these malicious blocks, once signed and broadcast to the network, may be accepted and added to the blockchain by other honest validators, thereby causing irreversible damage to the integrity and security of the blockchain.
- Permanent risk: Unlike validator nodes that only provide signature services, when the validator node itself is compromised and the private key is leaked, this risk is permanent. Because once the private key is stolen, unless other means (such as private key recovery, key rotation, etc.) are used to regain control, the attacker will always have the ability to impersonate the validator and engage in malicious operations.
If the validator node is compromised and the private key is leaked, the blockchain network will face a permanent security threat. Therefore, we must take strict security measures to protect the security of the validator node and the private key to prevent such incidents from occurring.
Please confirm the translation before proceeding to the next stage.
1.2 When we only provide signature services for validators, if the validator node is compromised or damaged, we will face the risk of erroneously signing blocks.
==Detailed Explanation:==
The security risks faced by a validator node when it only provides signature services can be understood by breaking it down into several key parts:
- The Role of a Validator: In a blockchain network, validators are responsible for verifying the legitimacy of transactions and blocks, and confirming that these blocks are valid and accepted by the network through signatures. The validator's signature is an important part of the blockchain consensus mechanism because it ensures the immutability of the blocks and the security of the network.
- Signature Service: The "signature service" mentioned here refers to a function provided by the validator node, which uses its private key to sign blocks. The private key is the core of the validator's identity, and only the validator with the private key can generate a valid signature. Therefore, the signature service is a key part of the validator node's role in the blockchain network.
- Risk of Validator Node Compromise: If the validator node is compromised by hackers or other malicious parties (i.e., "compromised"), then the attackers can control the node's private key and use it for malicious activities. In this case, attackers can generate and sign malicious blocks that may be accepted by the network, thereby threatening the integrity and security of the blockchain.
- Risks During the Operation of Signature Services: The text points out that when a validator node only provides signature services, if the node is compromised, then as long as the signature service is still running, attackers can continuously sign malicious blocks. This means that until the signature service is shut down or repaired, the entire blockchain network may be at risk of being contaminated by malicious blocks.
In summary, when we use a validator node that only provides signature services, we must pay great attention to its security. Because if such a node is compromised, attackers can use it to cause significant damage to the blockchain network, and this damage will continue to exist until the signature service is repaired. Therefore, ensuring the security of the validator node is an important part of maintaining the overall security of the blockchain network.
1.3 Validators Participate in Public Networks, and Their Addresses May Be Discovered or Attacked, Leading to Node Crashes, Network Congestion, or Non-malicious Operational Errors That May Result in Losses for You and Your Delegators.
-
Your validator failed to sign or propose blocks. The following situations may occur:
- Your computer has been offline for too long.
- Your computer did not receive updates in a timely manner.
-
Your validator incorrectly signed two valid blocks at the same height. This situation may occur if:
- Your failover validator is configured incorrectly.
- Your two computers use the same key.
2. Solutions
2.1 For the Situation Described in 1.1
We can store the private key in a ==Hardware Security Module (HSM)==. During the offline setup of the HSM, it can only be retrieved once. Subsequently, this HSM device remains inserted into the computer running the validator or signature service.
2.2 For the Situation Described in 1.2
We can utilize a dedicated Key Management System (KMS). It operates on a computer separate from your validator node but has access to the hardware key and can communicate with your validator node over a private network (or be contacted by your validator node) for signing blocks. Such a KMS is specialized, for example, it can detect attempts to sign two different blocks at the same height.
Tendermint KMS polls the microservice you provide at the interval you specify to obtain transactions for signing. After signing, it automatically submits them to the Tendermint full node, which means the microservice generating the transactions only needs to be responsible for constructing the transactions, with the rest handled by the KMS.
The KMS makes a "webhook" style HTTP request to the transaction microservice at a specified interval (i.e., a block height interval) to request a batch of transactions to be signed, which are then submitted to the Tendermint node for broadcasting:
- The transaction microservice generates a batch of transactions that need to be signed. For example, for an Oracle service, it sends requests to multiple exchanges and calculates the average price pair, then generates a JSON document (currently Amino JSON) to describe the transaction that needs to be signed.
- The KMS retrieves the batch of transactions to be signed from the transaction microservice. If it is not empty, it parses the JSON, checks it against the specified framework of the given network transaction format, reviews the proposed transaction against an access control list to ensure it has the right to sign, computes the signature using the specified account key (ECDSA/Secp256k1), and then serializes the transaction in binary format (currently Amino, soon to be Protobuf).
- The signed transactions are then submitted to the specified Tendermint node to be broadcast to the P2P network and included in the blockchain.
2.3 For the Situation Described in 1.3.1
A Denial of Service (DoS) attack occurs when an attacker sends a large amount of internet traffic to a specific IP address to prevent the server at that IP address from connecting to the internet.
Attackers scan the network, attempting to identify the IP addresses of various validator nodes, and disrupt their communications by sending a flood of traffic to them. One recommended method to mitigate these risks is for validators to carefully construct their network topology using a sentinel node architecture.
Validator nodes should only connect to full nodes that they trust, either because they operate the full nodes themselves or because the trusted full nodes are run by other validators they are familiar with. Validator nodes typically run in data centers. Most data centers offer direct links to the networks of major cloud providers. Validators can use these links to connect to sentinel nodes in the cloud. This mitigation strategy shifts the burden of a DoS attack from the validator's node directly to its sentinel nodes, and it may require the launch or activation of new sentinel nodes to mitigate attacks on existing ones.
Sentinel nodes can be quickly launched or change their IP addresses. Since the links with sentinel nodes are located in private IP space, internet-based attacks cannot directly interfere with them. This strategy ensures that the validator's block proposals and votes have a higher chance of reaching the rest of the network.
3. Setting Up KMS in a Testnet
4. Setting Up a Sentinel Cluster in the Testnet
4.1 Preparation Phase:
In the testnet environment, there are a total of 9 nodes, namely node0 to node8. We will launch the validator nodes and their corresponding sentinel nodes through docker-compose on these 9 nodes.
A total of 18 nodes need to be launched.
The node0 has a Golang environment, Docker, and Docker Compose installed.
git clone https://github.com/treasurenetprotocol/treasurenet.git
git branch
git checkout main
Generate the image:
cd /root/go/src/treasurenet/
make localnet-build
docker images
Check if we have successfully generated the image.

Regarding the operation of uploading to Docker Hub, I have written a placeholder account; please replace it with your own.
docker login -u ****

*************************(Docker Hub password)

docker tag treasurenetd:latest dongqi1/treasurenetd:latest

docker push dongqi1/treasurenetd:latest
You can also directly download our latest image from Docker Hub.
docker pull treasurenet/treasurenetd:latest
4.2 Begin Deployment
Generate the validator information by running the script init-gravity1.sh. In our test environment, there are 9 nodes, each with its own initialization script.
Create a treasurenet directory in /data and within treasurenet, create the mapped directories for the validator and the sentry-node0.
bashmkdir /data/treasurenet
mkdir /data/treasurenet/sentry-node0
ll
.treasurenet   // Directory mapping for the validator
sentry-node0   // Directory mapping for the sentinel on node0
Example of the init-gravity.sh script:
#!/bin/bash
set -eux
# your gaiad binary name
BIN=./treasurenetd

CHAIN_ID="treasurenet_5005-1"

ALLOCATION="10000000000000000000000aunit,10000000000stake,10000000000footoken,10000000000footoken2,10000000000ibc/nometadatatoken"
KEY1="validator0"
KEY2="orchestrator0"
CHAINID="treasurenet_5005-1"
MONIKER="node0"
KEYRING="file"
KEYALGO="eth_secp256k1"
LOGLEVEL="info"
TRACE="--trace"
# validate dependencies are installed
command -v jq > /dev/null 2>&1 || { echo >&2 "jq not installed. More info: https://stedolan.github.io/jq/download/"; exit 1; }
$BIN config keyring-backend $KEYRING
$BIN config chain-id $CHAINID
GAIA_HOME="--home /home/ec2-user/.treasurenetd"
ARGS="$GAIA_HOME --keyring-backend file"
# Generate a validator1 key, orchestrator1 key, and eth key for each validator1
$BIN keys add $KEY1 --keyring-backend $KEYRING --algo $KEYALGO 2>>
/data/treasurenet/validator0-phrases
$BIN keys add $KEY2 --keyring-backend $KEYRING --algo $KEYALGO 2>>
/data/treasurenet/orchestrator0-phrases
$BIN eth_keys add --keyring-backend $KEYRING >> /data/treasurenet/validator0-eth-keys
$BIN init $MONIKER --chain-id $CHAINID --keyring-backend $KEYRING --home /home/ec2-user/.treasurenetd
cat $HOME/.treasurenetd/config/genesis.json | jq '.app_state["staking"]
["params"]["bond_denom"]="aunit"' >
$HOME/.treasurenetd/config/tmp_genesis.json && mv
$HOME/.treasurenetd/config/tmp_genesis.json
$HOME/.treasurenetd/config/genesis.json
cat $HOME/.treasurenetd/config/genesis.json | jq '.app_state["crisis"]
["constant_fee"]["denom"]="aunit"' >
$HOME/.treasurenetd/config/tmp_genesis.json && mv
$HOME/.treasurenetd/config/tmp_genesis.json
$HOME/.treasurenetd/config/genesis.json
cat $HOME/.treasurenetd/config/genesis.json | jq '.app_state["gov"]
["deposit_params"]["min_deposit"][0]["denom"]="aunit"' >
$HOME/.treasurenetd/config/tmp_genesis.json && mv
$HOME/.treasurenetd/config/tmp_genesis.json
$HOME/.treasurenetd/config/genesis.json
cat $HOME/.treasurenetd/config/genesis.json | jq '.app_state["mint"]["params"]
["mint_denom"]="aunit"' > $HOME/.treasurenetd/config/tmp_genesis.json && mv
$HOME/.treasurenetd/config/tmp_genesis.json
$HOME/.treasurenetd/config/genesis.json

cat $HOME/.treasurenetd/config/genesis.json | jq '.consensus_params["block"]
["time_iota_ms"]="1000"' > $HOME/.treasurenetd/config/tmp_genesis.json && mv
$HOME/.treasurenetd/config/tmp_genesis.json
$HOME/.treasurenetd/config/genesis.json
cat $HOME/.treasurenetd/config/genesis.json | jq '.consensus_params["block"]
["max_gas"]="10000000"' > $HOME/.treasurenetd/config/tmp_genesis.json && mv
$HOME/.treasurenetd/config/tmp_genesis.json
$HOME/.treasurenetd/config/genesis.json

# disable produce empty block
if [[ "$OSTYPE" == "darwin"* ]]; then
	sed -i '' 's/create_empty_blocks = true/create_empty_blocks = false/g'
$HOME/.treasurenetd/config/config.toml
else
	sed -i 's/create_empty_blocks = true/create_empty_blocks = false/g'
$HOME/.treasurenetd/config/config.toml
fi
# add in denom metadata for both native tokens
jq '.app_state.bank.denom_metadata += [{"name": "Foo Token", "symbol": "FOO", "base": "footoken", display: "mfootoken", "description": "A non-staking test token", "denom_units": [{"denom": "footoken", "exponent": 0}, {"denom": "mfootoken", "exponent": 6}]},{"name": "Stake Token", "symbol": "STEAK", "base": "aunit", display: "unit", "description": "A staking test token", "denom_units": [{"denom": "aunit", "exponent": 0}, {"denom": "unit", "exponent": 18}]}]' /home/ec2-user/.treasurenetd/config/genesis.json >
/home/ec2-user/treasurenet-footoken2-genesis.json
jq '.app_state.bank.denom_metadata += [{"name": "Foo Token2", "symbol": "F20", "base": "footoken2", display: "mfootoken2", "description": "A second non-staking test token", "denom_units": [{"denom": "footoken2", "exponent": 0}, {"denom": "mfootoken2", "exponent": 6}]}]' /home/ec2-user/treasurenet-footoken2-genesis.json > /home/ec2-user/treasurenet-bech32ibc-genesis.json

# Set the chain's native bech32 prefix
jq '.app_state.bech32ibc.nativeHRP = "treasurenet"' /home/ec2-user/treasurenet-bech32ibc-genesis.json > /home/ec2-user/gov-genesis.json
mv /home/ec2-user/gov-genesis.json /home/ec2-user/.treasurenetd/config/genesis.json
validator1_KEY=$($BIN keys show validator0 -a $ARGS)
orchestrator1_KEY=$($BIN keys show orchestrator0 -a $ARGS)
$BIN add-genesis-account $ARGS $validator1_KEY $ALLOCATION
$BIN add-genesis-account $ARGS $orchestrator1_KEY $ALLOCATION

orchestrator1_KEY=$($BIN keys show orchestrator0 -a $ARGS)
ETHEREUM_KEY=$(grep address /data/treasurenet/validator0-eth-keys | sed -n "1"p | sed 's/.*://')
echo $ETHEREUM_KEY

$BIN gentx $ARGS --moniker $MONIKER --chain-id=$CHAIN_ID --ip node0.testnet.treasurenet.io validator0 200000000000000000000aunit
$ETHEREUM_KEY $orchestrator1_KEY

$BIN collect-gentxs
==Note: When creating the genesis transaction with gentx, if the IPs are within the same local network, you can use the internal (private) IPs.==
4.3 Generate the Latest genesis.json File
Each node will generate a genesis.json file, and we need to merge the genesis.json from the 9 nodes to create a new genesis-new.json.
The parts that need to be merged are shown in the image below:
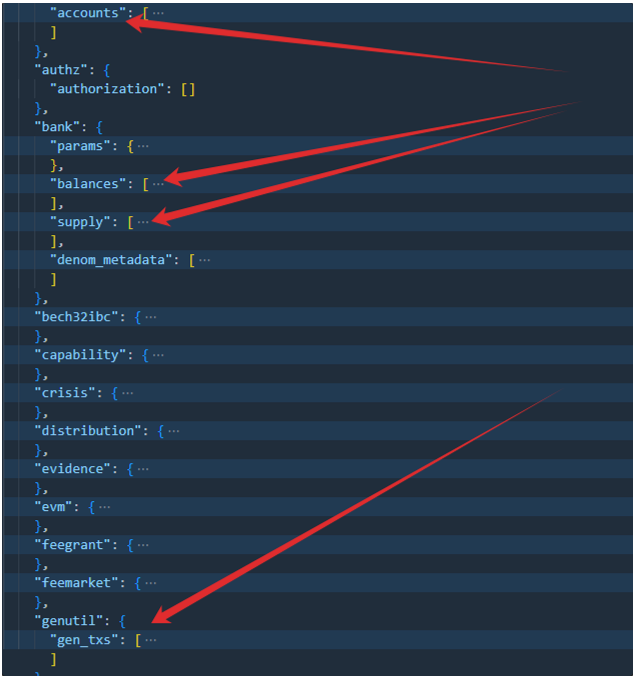
After generating the new genesis.json, you need to replace the genesis.json in the nodes from node0 to node9.
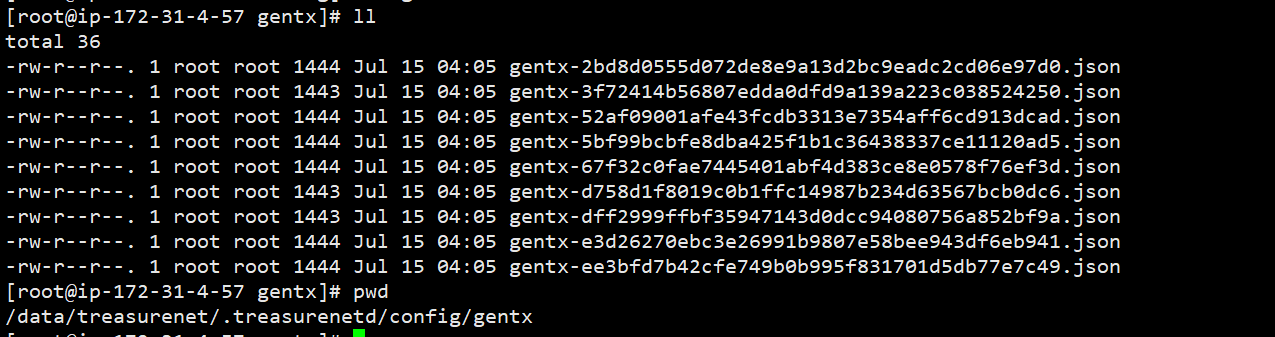
Additionally: In the gentx directory, the gentx files from nodes node0 to node9 need to be placed together.
Initialize on the sentry nodes of node0 to node9 respectively.
docker run --rm -i \
	-v $(pwd)/treasurenet/sentry-node0:/root/.treasurenetd \
	treasurenetd:latest \
	treasurenetd init node0 --chain-id "treasurenet_5005-1"
./treasurenetd tendermint show-node-id --home /data/treasurenet/sentry-node0/
node-id@node0.sentry.com:26656
docker run --rm -i \
	-v $(pwd)/treasurenet/sentry-node1:/root/.treasurenetd \
	dongqi1/treasurenetd:latest \
	treasurenetd init node1 --chain-id "treasurenet_5005-1"
treasurenetd tendermint show-node-id --home /data/treasurenet/sentry-node1/
node-id@node1.sentry.com:26656
docker run --rm -i \
	-v $(pwd)/treasurenet/sentry-node2:/root/.treasurenetd \
	dongqi1/treasurenetd:latest \
	treasurenetd init node2 --chain-id "treasurenet_5005-1"
treasurenetd tendermint show-node-id --home /data/treasurenet/sentry-node2/
node-id@node2.sentry.com:26656
docker run --rm -i \
	-v $(pwd)/treasurenet/sentry-node3:/root/.treasurenetd \
	dongqi1/treasurenetd:latest \
	treasurenetd init node3 --chain-id "treasurenet_5005-1"
treasurenetd tendermint show-node-id --home /data/treasurenet/sentry-node3/
node-id@node3.sentry.com:26656
docker run --rm -i \
	-v $(pwd)/treasurenet/sentry-node4:/root/.treasurenetd \
	dongqi1/treasurenetd:latest \
	treasurenetd init node4 --chain-id "treasurenet_5005-1"
treasurenetd tendermint show-node-id --home /data/treasurenet/sentry-node4/
node-id@node4.sentry.com:26656
docker run --rm -i \
	-v $(pwd)/treasurenet/sentry-node5:/root/.treasurenetd \
	dongqi1/treasurenetd:latest \
	treasurenetd init node5 --chain-id "treasurenet_5005-1"
treasurenetd tendermint show-node-id --home /data/treasurenet/sentry-node5/
node-id@node5.sentry.com:26656
docker run --rm -i \
	-v $(pwd)/treasurenet/sentry-node6:/root/.treasurenetd \
	dongqi1/treasurenetd:latest \
	treasurenetd init node6 --chain-id "treasurenet_5005-1"
treasurenetd tendermint show-node-id --home /data/treasurenet/sentry-node6/
node-id@node6.sentry.com:26656
docker run --rm -i \
	-v $(pwd)/treasurenet/sentry-node7:/root/.treasurenetd \
	dongqi1/treasurenetd:latest \
	treasurenetd init node7 --chain-id "treasurenet_5005-1"
treasurenetd tendermint show-node-id --home /data/treasurenet/sentry-node7/
node-id@node7.sentry.com:26656
docker run --rm -i \
	-v $(pwd)/treasurenet/sentry-node8:/root/.treasurenetd \
	dongqi1/treasurenetd:latest \
	treasurenetd init node8 --chain-id "treasurenet_5005-1"
treasurenetd tendermint show-node-id --home /data/treasurenet/sentry-node8/
node-id@node8.sentry.com:26656

//These are the two seed nodes generated.
docker run --rm -i \
	-v $(pwd)/treasurenet/sentry-sepolia:/root/.treasurenetd \
	dongqi1/treasurenetd:latest \
	treasurenetd init sentrysepolia --chain-id "treasurenet_5005-1"
treasurenetd tendermint show-node-id --home /data/treasurenet/sentry-sepolia/

docker run --rm -i \
	-v $(pwd)/treasurenet/sentry-cosmosexplorer:/root/.treasurenetd \
	dongqi1/treasurenetd:latest \
	treasurenetd init sentrycosmos --chain-id "treasurenet_5005-1"
treasurenetd tendermint show-node-id --home /data/treasurenet/sentry-cosmosexplorer/
==Note: When performing the initialization, it is best to keep the names of the treasurenetd init [moniker] sentinel nodes and validator nodes consistent.==
Key Step: Modify the Configuration Files
Validator node's mapping directory:
/data/treasurenetd/.treasurenetd sentryNode's mapping directory:
/data/treasurenet/sentry-node0
Modify .treasurenetd/config/config.toml (for the validator node)
# Comma separated list of nodes to keep persistent connections to
persistent_peers = "node-id@node0.sentry.com:26656"
# Set true to enable the peer-exchange reactor
pex = false
Modify sentry-node0/config/config.toml (for the node0 sentinel node)
# Comma separated list of seed nodes to connect to
seeds = "node-id@node1.sentry.com:26656,node-id@node2.sentry.com:26656,node-id@node3.sentry.com:26656,node-id@node4.sentry.com:26656,node-id@node5.sentry.com:26656,node-id@node6.sentry.com:26656,node-id@node7.sentry.com:26656,node-id@node8.sentry.com:26656"

# Comma separated list of nodes to keep persistent connections to
persistent_peers = "node-id@node0.testnet.treasurenet.io:26656"
# Comma separated list of peer IDs to keep private (will not be gossiped to other peers)
private_peer_ids = "node-id"
Modify sentry-node0/config/app.toml (for the node0 sentinel node)
[api]

# Enable defines if the API server should be enabled.
enable = true

# Swagger defines if swagger documentation should automatically be registered.
swagger = false

# Address defines the API server to listen on.
address = "tcp://0.0.0.0:1317"
docker-compose.yaml (example in node0)
version: '3.8'

networks:
	treasurenet-test:

services:
	node0.testnet.treasurenet.io:
	container_name: node0.testnet.treasurenet.io
	image: dongqi1/treasurenetd:latest
	entrypoint: /bin/bash
	command: -c "echo '$KEYRING_PASSWORD' | treasurenetd start --keyring-backend file --chain-id treasurenet_5005-1"
	volumes:
	- /data/treasurenet/.treasurenetd:/root/.treasurenetd
	networks:
	- treasurenet-test
	node0.sentry.com:
	container_name: node0.sentry.com
	image: dongqi1/treasurenetd:latest
	command: treasurenetd start --chain-id treasurenet_5005-1  -- evm.tracer=json --json-rpc.api eth,txpool,net,web3,miner --pruning=nothing -- trace --json-rpc.address 0.0.0.0:8555 --rpc.laddr tcp://0.0.0.0:26657 --x-crisis-skip-assert-invariants
	volumes:
	- /data/treasurenet/sentry-node0:/root/.treasurenetd
	ports:
	- "26656:26656"
	- "26657:26657"
	- "8555:8555"
	- "8546:8546"
	- "8125:8125"
	- "9090:9090"
	- "1317:1317"
	extra_hosts:
	############# Internal Network ############

	- "node1.sentry.com:[node1's internal IP]"
	- "node2.sentry.com:[node2's internal IP]"
	- "node3.sentry.com:[node3's internal IP]"
	- "node4.sentry.com:[node4's internal IP]"
	- "node5.sentry.com:[node5's internal IP]"
	- "node6.sentry.com:[node6's internal IP]"
	- "node7.sentry.com:[node7's internal IP]"
	- "node8.sentry.com:[node8's internal IP]"
	networks:
	- treasurenet-test
Before starting docker-compose, IP mapping needs to be performed in each node.
vi /eth/hosts
ip   node0.sentry.com
ip   node1.sentry.com
ip   node2.sentry.com
ip   node3.sentry.com
ip   node4.sentry.com
ip   node5.sentry.com
ip   node6.sentry.com
ip   node7.sentry.com
ip   node8.sentry.com